April 30, 2014

Tracing network though network tools using Wireshark

Introduction

The home interface of wireshark looks like shown below. Using wireshark we can easily trace what is happening in the network. Wireshark basically snoops your network interface to see what data bits is going through and interprets into meaningful protocols.


Here are some examples people use Wireshark for:
  • network administrators use it to troubleshoot network problems
  • network security engineers use it to examine security problems
  • developers use it to debug protocol implementations
  • people use it to learn network protocol internals
Beside these examples, Wireshark can be helpful in many other situations too.

The main window is divided into list pane(above), details pane(below) and bytes pane(right) as shown in figure
  • The packet list pane displays a summary of each packet captured. By clicking on packets in this pane you control what is displayed in the other two panes.
  • The packet details pane displays the packet selected in the packet list pane in more detail.
  • The packet bytes pane displays the data from the packet selected in the packet list pane, and highlights the field selected in the packet details pane.
This completes introduction to wireshark. Now it is time to see some protocols in action.

1.Ping:


Ping like any other network tools can be easily traced using wireshark. Below is my network interface configuration. It is a wireless adapter with dynamically allocated IP 192.168.33.120


        1) Start with ping 8.8.8.8 (gooogle dns)


        2) Now click the green start button after choosing your current network interface.


        3Wireshark starts tracing the packets once you start it. It is recommended to start wireshark before using any network tools so that you don't miss needed packets. Type icmp in the filter box to see only ping packets.


2. Trace Route:

Traceroute helps to find the path taken by the packet to reach the destination. The main field to note here is the TTL which determines how many hops are needed to reach the destination.

        1Now click the green start button after choosing your current network interface.


        2Type traceroute 8.8.8.8 in linux and trroute 8.8.8.8 in windows


        3Above is shown path to 8.8.8.8 which takes around 12 hops to reach destination. The wireshark trace is shown below. Here you can see TTL to be 5. Three packets for each TTL is recorded and shown here.


3. WGET:

Wget is a tool used to fetch a web page using CLI instead of a web browser. Here am going to shown trace while fetching www.google.com

        1Click the green start button after choosing your current network interface.


        2Type wget www.google.com in terminal. Make sure you have already installed the wget package. An HTTP request is sent and a response index.html.1 is received back.


        3Shown below a typical TCP three way handshake Request-Response-Ack for connection establishment.


        4DHCP: DHCP server allocates IP address dynamically whenever new host joins it's network. Trace of DHCP server 172.16.28.1 allocating IP address 172.16.29.195 is shown where DORA procedure takes place.


        5ARP: Here using the same trace we can see network configuration protocol like ARP in action. ARP is used to find the mac address when IP address of the destination is known. Just type arp in filter box to see only arp packets.


        6DNS: Domain name service is used to find the IP address given a URL eg: www.google.com > 74.125.200.104. Trace shown below with Queries and answers of www.google.com. Type DNS to see only dns packets


April 17, 2014

How to install Fedora 20 64bit on new machine or as a replacement for XP

I am going to show how to install fedora 20 64bit as a replacement for your existing XP or a fresh installation. Remember to backup important data before any installation procedure.

1. Download fedora 20 64bit - This file is around 900MB so wait patiently
Fedora 20 64-bit
2. Download Fedora live USB installer – 13MB file to make fedora bootable from your USB. 2GB min USB size needed
3. Install Live USB in your current XP/Win7/Win8 OS and choose your C directory preferably. Don’t install in USB 


4. Run LiveUSB Creater from below screen or from Start Menu 


5. Now it is time to choose the Fedora 20 OS that we have downloaded. By default the target pen drive is highlighted if not select the USB which you want to make as bootable


6. Click browse and choose the OS ISO file


7. Click create USB. ‘Extracting live image…’ appears. Wait for FEDORA 20 ISO to be copied to the USB. LiveUSB automatically makes the USB boot-able.


8. Once completed, close the window and reboot system with the pen drive present. Remember that you can either install fedora alongside windows or do a complete replacement. Here I am showing a method to replace windows XP.

9.  Now boot into drive and start the installation by entering flash drive


10. Start Fedora Live. This will start a live instance just like a demo from where you can install


11. Click install to hard drive and choose your installation destination


12. Now choose your Hard Disk if multiple hard disks are present and click done


13. Click custom partitioning and delete all existing partitions. Please note that this will delete all existing data. So carefully delete only the volumes that are unnecessary to get space.


14. After you have enough space for installation, click ‘click here to create them automatically’ 


15. The partitions are automatically created and shown as preview. Till here only changes are shown and not applied to the system . In case you want to revert , click Reset All else click Done and click ‘Accept Changes’


16. Choose your root and user password. Don’t lose these password as it is not possible to recover


17. Finally, wait for the installation to get over. Once installation is done. Click Quit. Restart System


18. After you have rebooted and logged in, it is time to do some installations to enable Flash, Java, Chrome, Mp3 etc…

19. Open app called Terminal and type ‘su’. Enter root password.

20. We’ll now include the repositories which are internet directories from which softwares are downloaded and installed. RPM Fusion and Livna are the needed repositories. Open Terminal application and paste the following

RPM Fusion:
su -c 'yum localinstall --nogpgcheck http://download1.rpmfusion.org/free/fedora/rpmfusion-free-release-$(rpm -E %fedora).noarch.rpm http://download1.rpmfusion.org/nonfree/fedora/rpmfusion-nonfree-release-$(rpm -E %fedora).noarch.rpm'

Livna:

Chrome Browser:
  • Type vim /etc/yum.repos.d/google-chrome.repo then , copy the following into the file and enter :wq to save the file
[google-chrome]name=google-chrome - 64-bit
baseurl=http://dl.google.com/linux/chrome/rpm/stable/x86_64
enabled=1
gpgcheck=0
  • Enter yum install google-chrome-stable


Java:
  • Download from Java Website
  • Change to the directory in which you have downloaded java. Type:
cd 
For example, to change to download directory, Type:
cd /home/user/Downloads/
  • Install the package. 
rpm -ivh  
  • Delete the .rpm file if you want to save disk space.

Flash:
  • Download from Adobe Website
  • Change to the directory in which you have downloaded java. Type:
cd 
For example, to change to download directory, Type:
cd /home/user/Downloads/
  • Add the repository. This only adds flash repository
rpm -ivh
  • Install flash
yum install flash-plugin nspluginwrapper alsa-plugins-pulseaudio libcurl

Remember that all the above mentioned procedures require root access.


April 11, 2014

How to add user defined function to library in C?

Hey Guys,
It may seem daunting at first but it is pretty much simple and am going to show you how to add a function to library in the gcc environment. I'll be using factorial as an example here.

Few things to remember,
  1. Library functions are precompiled programs to help save time while calling them
  2. You have to convert your function into a object file i.e factorial.o before saving them into the library
  3. After compilation, you can either link the library manually or link it via includes while executing. But here am going to show you how to do linking manually
Steps to be followed:
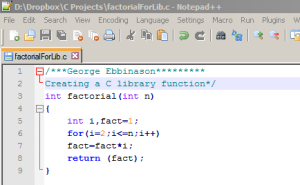
  • Create a user defined function which you want to add to library in the following format.
  • c3
  • go to cmd and change to the current folder where the program is stored.
  • Type gcc  -c  .\factorial.c . Here -c tells the compiler to convert the source code .c into an object code .oc4
  • c4
  • So you have converted the function into object file. Now it's time to add it to the library file which is usually someName.a
  • Type ar rvs  libsoe.a  .\factorialForLib.o c5
  • c5
  • In the above line, r means to replace objects in the library, The v option means verbose which tells you what is happening and when you use ar to make libraries of objects, use the s option.
  • Since we have added the function into the library , it is time for linking the library and using it in our calling program.
  • Type  gcc  .\factUsingLib.c  .\libsoe.a  -o  .\factUsingLibc6
  • c6
  • Now you would have successfully called a used defined library manually.

For more info click here

How to install C in Windows for free?


There are three components  needed to start programming using C language. They are Editor, Compiler and Interpreter
  1. Editor – Download and install the latest copy of Notepad++
  2. Compiler - Download and install latest version of MinGW
  3. Interpreter – Use command prompt or power shell
Steps to start programming:
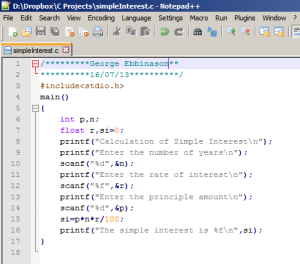
  • First type your C code in notepad++ and save it as someName.c 
     c1
  • With MinGW already installed and GCC ready to compile your program, it is time for your code to be converted into object code and then execution
  • Open cmd or powershell and go the directory where the c file is stored.
  • With the environment variable already set, use the command gcc someName.c -o someNamec2
  • Now just open the created exe file directly or using cmd. Voila!!! you got your first successful program runningc